Andrew Lyu, MD and Sahar Ahmad, MD
Introduction
Central venous catheters (CVCs) are instrumental in the management of critical ill patients, allowing the delivery of medications such as vasopressors or nutrition (e.g., TPN) and providing vascular access when peripheral venous access is insufficient. Over 5 million CVCs are placed each year, with roughly 8% of hospitalized patients undergoing such a procedure [1].
Adverse events related to placement of CVCs include arterial injury, puncture of nearby structures, and complications such as hemothorax or pneumothorax. The use of ultrasound (US) has reduced such adverse events and has also been useful for pre- and post-procedural monitoring. Compared with anatomic landmark-guided placement or the “cut-down method” whereby an incision is made to directly visualize the vein, peri-procedural 2-D or Doppler US significantly increases operator success in venous catheterization [2]. US reduces the rate of complications, such as carotid puncture, hemothorax, and pneumothorax when compared to the landmark-guided technique [3]. US-guided placement of CVC has therefore become the standard of care as recommended by the US Agency for Healthcare Research and Quality (AHRQ) and UK National Institute of Clinical Excellence [4].
Ultrasound – Protocol Peri-procedure
Please note that this chapter describes only the US components of the CVC procedure. Refer to your other simulation training materials for the entirety of the procedure itself.
Pre-procedure:
Place the patient in Trendelenberg position to engorge the veins of the neck. Rotate the head 15-45 degrees opposite the side of examination/catheterization. Position the US machine such that the screen is in direct line of sight of the operator during the entire procedure.
1. Identify Anatomy
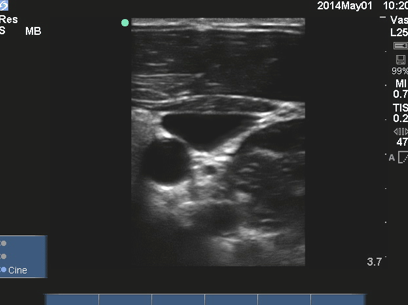
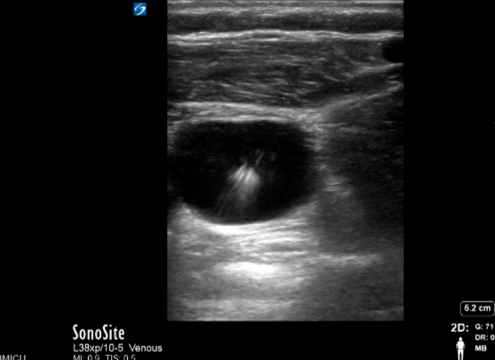
Using a high-frequency linear array probe with the probe marker operator left, examine the mid-neck using the transverse “short” access view (probe perpendicular to course of vessels) to identify the sternocleidomastoid muscle, the internal jugular vein, and the internal carotid artery. Veins and arteries will appear black (anechoic), with veins being more easily compressed and with thinner walls. Arteries nearly always perfectly round whereas veins are typically not so.

2. Rule out vessel thrombosis and stenosis.
Slide the probe along the course of the vessels (up and down from base of neck to clavicle while holding the probe in the same transverse view) to assess for stenosis or thrombosis – if either is present, an alternative site should be considered. Thrombosis is suggested when during a 90 degrees compression of the vessel you ae unable to view the anterior and posterior vessel walls juxtapose, or you see an obvious echo- dense thrombus within the vessel lume.
Stenosis is suggested when the vein’s wall is thick, round often echogenic, and there is a sudden change in caliber of the vessel as you track up and down the neck. Note that this can only be picked up by allowing full recoil of the vessel after you compress; and note also that in normals, the Right IJ vein is larger caliber than the left IJ vein, and all vessels decrease slowly in caliber as you move distally cephalad.
3. Assess for lung sliding
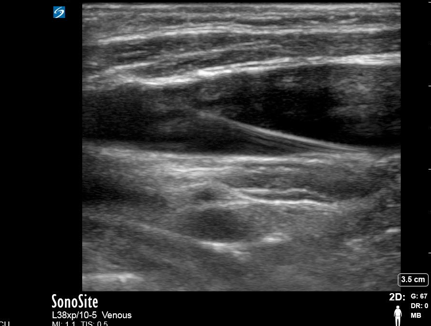
Assess the anterior lung fields for lung sliding and pre-procedural pneumothorax (see chapter on pneumothorax). This will help you pick up occult pneumothorax, other pleural/ parenchymal abnormalities (which assist in deciding which side of neck to place the CVC at) as well as serve as the baseline comparator for re- checking this finding post- procedure when you need to rule in or rule out pneumothorax secondary to your procedure.
4. Optimizing Access View
Ensure that the target vessel is in the center of the screen and the appropriate gain is set. In the transverse “short” axis view, create a scan plane which produces a view where the vessels are side by side rather than on top of each other. This usually requires two moves of the probe: few centimeters medially (not up and down the neck, but slide the probe towards the front of the neck) followed by a tilt of the probe such that the scan plane aims outwards (tail of the probe tilts towards the chin). With this simple maneuver, a safe site for access can be achieved, as we have now reduced the possibility of entering the carotid artery in case the posterior wall of the IJ vein is punctured through. If this optimization cannot be achieved, an alternative site should be considered or a repositioning of the patient can be tried.
Intra-procedure Ultrasound
Prep the patient in the usual sterile fashion. Anesthetize the prepared area, and optimize the vessels, again as above such that the IJ is to the side of the artery.
1. Optimize view
Center the IJ vein on your screen, both vertical and lateral centering using sliding and depth, respectively.
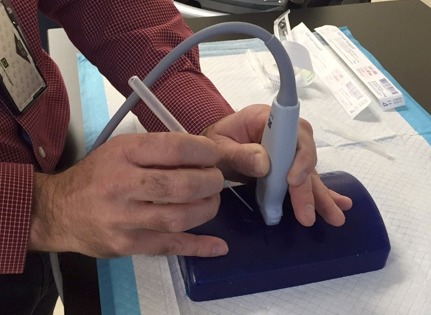
The needle angle should nearly match that of the probe’s scan plane in steepness as well as in directionality. Insert the needle at a steep angle (about 15 degrees off from the probe itself, almost parallel to the US beam). You will proceed to enter the skin then begin to hold suction by pulling back on the syringe.
2. Real-time guidance, tracking your needle tip
To be able to visualize your needle tip entering the anterior wall of the vessel, keep the steep angle discussed in the last step, and make very minor angle changes of the probe to track the tip of the needle as it approaches the vessel.
3. Confirmation of guidewire
Once there is flashback in the attached syringe, place the guidewire through the needle. Once the guidewire is inserted, remove the needle as per usual procedure protocol.
Once the needle is out of the neck and the guidewire remains (you are holding the guidewire the entire time) you will confirm placement with US by rotating the probe in the short axis and long axis views. The short axis view is obtained by the same probe – hold you used to insert the needle, scanning right at the skin entry site. You will see the guidewire appear as a bright dot or blur at the anterior wall of the vessel as well as within the vessel itself.
The longitudinal view of the guidewire within the vessel is obtained by a 90 degrees rotation of the probe to obtain the longitudinal “long” axis view of the vessel, never letting go of the guidewire. Ensure that you first identify the target vessel (IJ vein) in short axis, keeping it centered as you perform this rotation, this way ensuring you have rotated open the IJ vein and not the nearby carotid. In a successfully placed guidewire you will see the guidewire sitting along the posterior (far) wall of the vessel, and not exiting out of the vessel.
Once guidewire placement is confirmed, continue placement of the catheter using the standard Seldinger technique.
Post-procedure
1. Rule out post procedure pneumothorax
Before leaving the room after your procedure, re-assess the anterior lung fields, using the same high frequency linear array (“vascular”) probe that you used for the procedure, for lung sliding in order to rule out post-procedure pneumothorax.
Present lung sliding prior to the procedure and present lung sliding post procedure is expected. Los of lung sliding on your post- procedure US check, particularly if the procedure was difficult and if the patient is symptomatic (hypoxic, respiratory distress, hypotension, absent breath sounds, higher peak pressures), should alert you to the development of pneumothorax. In this case, the fellow should be immediately notified to help evaluate for pneumothorax and aid in treatment.
2. Check catheter direction
Confirm catheter direction using the US probe in the transverse “short” axis view by scanning superiorly and inferiorly to the site of placement.

Pearls and Pitfalls
- Examine the lungs before and after catheterization to check for lung sliding. If you have not checked before the procedure, you will have no comparison for post procedure. Keep in mind that many patients have abnormal reduced or absent lung sliding at baseline due to underlying lung diseases other than pneumothorax.
- Slide the probe medial or lateral to obtain the optimal positioning of vein and artery such that the carotid artery does not underlies the target vein. This will prevent accidental entry through the vein into the artery.
- Squeeze out any air bubbles when placing the sterile US probe cover; air bubbles impede US wave transmission and decrease image quality.
- Apply minimal pressure while using the US probe as too much pressure can collapse the vein making catheterization difficult.
References
- McGee, D. C., & Gould, M. K. (2003). Preventing complications of central venous catheterization. New England Journal of Medicine, 348(12), 1123-1133.
- Hind, D., Calvert, N., McWilliams, R., Davidson, A., Paisley, S., Beverley, C., & Thomas, S. (2003). Ultrasonic locating devices for central venous cannulation: meta-analysis. Bmj, 327(7411), 361.
- Karakitsos, D., Labropoulos, N., De Groot, E., Patrianakos, A. P., Kouraklis, G., Poularas, J., … & Karabinis, A. (2006). Real-time ultrasound-guided catheterisation of the internal jugular vein: a prospective comparison with the landmark technique in critical care patients. Critical Care, 10(6), 1.
- Feller-Kopman, D. (2007). Ultrasound-guided internal jugular access: a proposed standardized approach and implications for training and practice. CHEST Journal, 132(1), 302-309.
